Lightroom: Using Presets for Image Editing
I have found that using presets in the Develop module is a major time saver, and can lead to a more consistent look to your images. This article will describe how the preset works, show you how to apply the Adobe-supplied presets that come with Lightroom, create user (customized) presets, and how to modify/update your user presets. Further, in the Library module, I will describe how to apply presets to images during the import process and how to “batch” process images using presets.
A preset in the Develop module is simply a collection of edit commands using the same edit controls (sliders) you normally use manually. To apply a preset in the Develop module, for example, simply click on the preset name in the Preset panel on the left side of the workspace, and the edit commands within that preset are automatically applied to the image you are editing.
The Preset panel display is shown in Figure 1. This shows a list of Lightroom and User presets. For illustration purposes I have highlighted the “Aged Photo” preset that is provided under Lightroom Color Presets. Figure 2 shows an image that has not been edited. Figure 3 shows the same image after clicking on the preset “Aged Photo”. When a preset is applied, Lightroom moves the same edit controls that you would move to achieve the same result. Figure 4 shows the Basic panel before applying the preset and Figure 5 shows the same panel with the preset commands applied. You can see that to achieve the “aged photo” look Lightroom changed the Color Temperature and Tint, darkened the blacks, and reduced Vibrance and Saturation. Presets can use any of the edit commands available to you, to include HSL, Tone Curve, Split Toning, Detail, Lens Corrections, etc.. Note: you can override (adjust) any of the commands that result from the application of a preset.
User (customized) presets are quite valuable in eliminating routine edits like lens corrections, highlight reduction, noise reduction, sharpening, etc. Often, these routine edits are specific to your camera or printer, and can be quite time consuming to add manually to each image. To create a user (customized) preset simply edit a typical image with all of the commands you would routinely use, especially basic panel edits, noise reduction, sharpening, etc. Figure 6 shows an example of a set of basic panel edits manually created.
Once you have manually applied all your edits to your sample image, simply click on the “+” symbol on the right side of the Presets panel (see figure 7) which will bring up the New Develop Preset dialog box (Figure 8). Create a Preset Name, indicate which preset folder you wish to add the preset to, and check off all of the settings you wish to include in the preset. In this case, the new preset called “Routine Edits” will be saved to the User Presets folder, and now can be used to add all of the checked settings to other images you edit.
If you wish to modify a user preset that you previously created, first you should apply the current preset to your image, then add your revised edits to your image. To save the revisions, simply right-click on the name of the current preset and select “Update with Current Settings”. Alternatively, you can create a new preset with a different name and rename or delete the old one by right-clicking on the preset name and selecting the appropriate command. Note: Lightroom-supplied presets cannot be modified.
In the Library module, you can apply presets in two very useful ways:
In the Library module, during import, select a preset in the Develop Settings box in the Apply During Import panel (see figure 9). This will add the preset commands to all images that you have selected for importing. The example shown will add the Lightroom preset “Auto Tone” to the imported images.
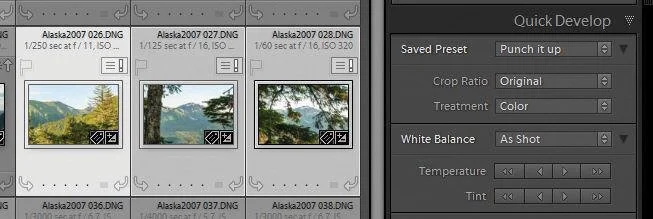
In the Library module grid view, Quick Develop panel, you can select multiple images and apply a desired preset to all of them simultaneously (see figure 10). This example shows the “Punch it up” user preset has been applied to the three highlighted images.
There are some edits that normally are not appropriate for commonly used presets, since they are best applied specifically to each individual image. They include local edits such as spot removal, crop tool, red/pet eye, gradient and radial filters, and the adjustment brush. A preset that contains lens corrections, such as an Upright command, may produce strange results, but can always be manually corrected later. I have also found that adjustments to the Whites and Blacks sliders (Basic panel) are best left until you view each image individually. You can then use them to help you correct highlight and shadow clipping.
In summary, Lightroom-supplied or User presets are a very valuable tools for automatically applying routine edits while increasing image quality and consistency.


